Have a chat with your Sanity content from VS Code
In this blogpost I will show you how to connect Visual Studio Code and GitHub Copilot to your Sanity project's MCP server, so you can start chatting away with your content. Using the MCP server, you can query Sanity for any type of content using natural language and even update or create new content following the project's content model.
Published:
What is MCP and Sanity MCP server?
The Model Context Protocol (MCP) is a standard created by Anthropic to define a dataset or tool that can be used by an AI model. The standard defines how the AI can read the data in the dataset, and what tools are available to query and manipulate the data.
Sanity announced in April that they have built an MCP server on top of their existing content API. This means that when you connect an AI tool like GitHub Copilot to a Sanity dataset, the bot gets information about your content model and also about how to create GROQ queries (Sanity's query language) to get or create content.
This can be a powerful tool if you are building AI helpers for your editors, but it's also really helpful for developers to get help writing GROQ queries or just to get a sense of the structure of the dataset.
Install the tools you need
Connecting MCP servers in VS Code / GitHub Copilot is still a preview feature. If you have Copilot through an organization, you need to enable preview features:
https://github.com/organizations/[organization-name]/settings/copilot/policies

VS Code: Settings and extensions
Install these extensions and enable them by logging in to GitHub:
GitHub Copilot
GitHub Copilot Chat
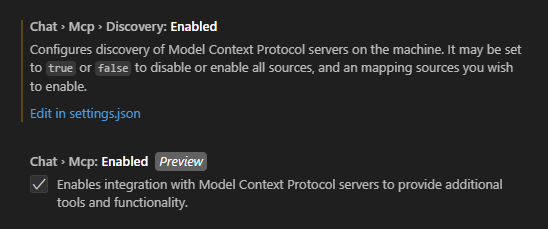
Enable the necessary features in VS Code settings. To quickly find them, open Settings and search for "mcp".
Chat > Mcp: Enabled (requires preview features to be turned on)
Chat > Mcp > Discovery: Enabled
Get the necessary information from Sanity
You need the following information from Sanity before you can connect to the MCP server:
Project id
Dataset name
API token
User role
To get all of them, go to https://www.sanity.io/manage and select your project.
Create a token under the "API" tab. Select "developer" role if you want to be able to write to the dataset in addition to read from it.
Set up the MCP server connection
You can store the MCP server connection settings globally or in a workspace. For me, it made most sense to store it in the same project where I have the Sanity content types and Studio setup.
To do that, start by opening the Sanity project in VS Code.
Start the MCP server setup wizard
The wizard really feels like a preview, and fails during 4 out of 5 attempts. If it crashes before you get through, just start over.
Make sure you have all the information from Sanity easily available for copy and paste.
Open the Command Palette, CTRL+SHIFT+P, and search for "MCP".
Select "MCP: Add server"
Type of MCP: Install from an NPM package
NPM package name: @sanity/mcp-server
Project id
Dataset name
API token
MCP user role: developer
Server id: sanity
Save in: Workspace Settings
Check the MCP server configuration file and start the server
Open the Command Palette
Search for "MCP"
Select "MCP: List Servers"
Select "sanity"
Select "Show Configuration"
You should now see the config file for the MCP server, vscode/mcp.json, that looks like this:
{
  "servers": {
    "sanity": {
      "command": "npx",
      "args": ["-y", "@sanity/mcp-server@latest"],
      "env": {
        "SANITY_PROJECT_ID": "abc",
        "SANITY_DATASET":    "production",
        "SANITY_API_TOKEN":  "xyz",
        "MCP_USER_ROLE":     "developer"
      }
    }
  }
}
If the server is not running, start it. You can start it from the menu embedded inside the configuration file or from the command palette "MCP: List Servers" → "sanity" → "Start server".
Use Copilot as an agent and connect it to the MCP server
Open the GitHub Copilot chat window from the command palette or from the Copilot icon on the top menu bar.
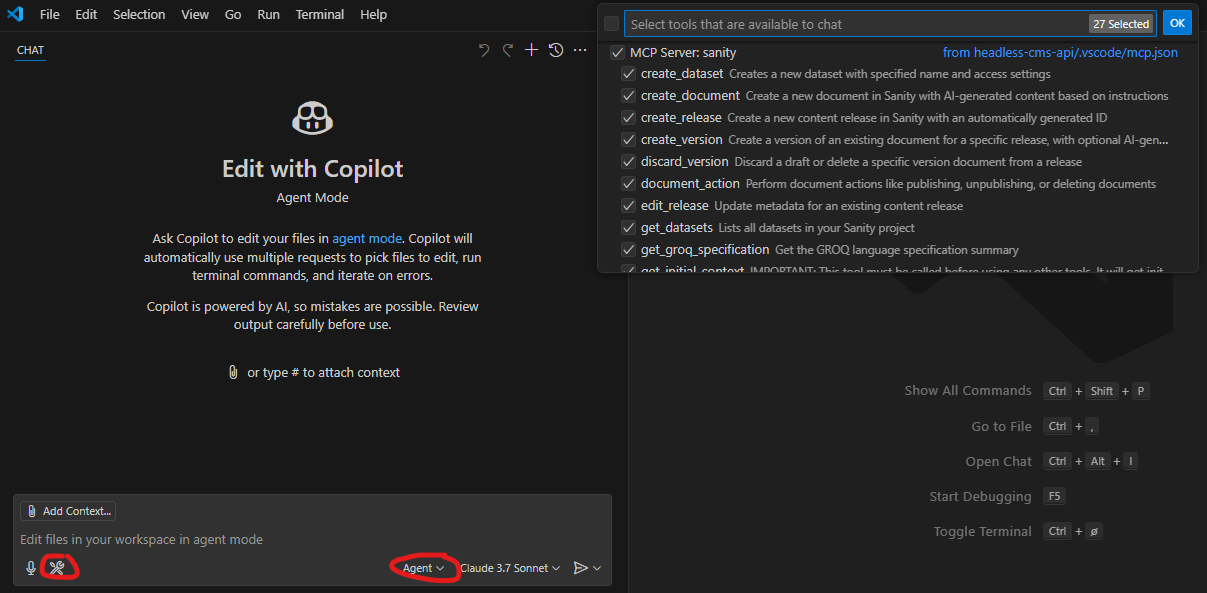
In the Copilot chat window, select Agent mode and open the tools menu to make sure the MCP server is available as a tool.
Start chatting!
Now you can ask questions about your content or content model, here are a few examples to get you started.
List all content types from Sanity
Show me the content model of the "post" content type
List the newest 3 "post" entries with "title", "slug", "excerpt" and "publishedAt"
Show me the groq query to get the newest 3 "post" entries with "title", "slug", "excerpt" and "publishedAt"
Do you want the bot to get information or write code for you?
The bot is really eager to start editing your project files, so if you don't want that, avoid words like "create a groq query", "fetch entries", and rather use words like "show me a groq query" and "list entries".